|
Home
Up
About the Boat
Sailing Photos
Crew Shots
Cruises
"Out There"
Ship's Blog
Visit
TheSailingChannel.TV
| |
Page 1
|
Page 2
|
Page 3
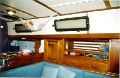 Original Ports with
fascia rot from leaks Original Ports with
fascia rot from leaks
The original ports all leaked causing rot in the white-painted teak
fascia. So I decided to replace the fascia as part of the project. |
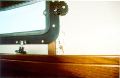 Fascia
rot detail Fascia
rot detail
Removing the ports would have destroyed the fascia in any event. |
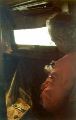
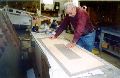
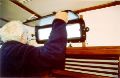 Irv
prepares to remove port lid Irv
prepares to remove port lid
My sailing friend, Irv, who owns a Pedrick 41 and is knowledgeable in the
many skills which I must learn provided a great deal of assistance. Here Irv
removes a port lid prior to removing the port frame. I also removed all the
teak trim around the fascia eventually sanding to bare wood and applying
five coats of satin varnish.
|
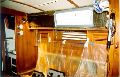 Starboard
saloon with port and fascia removed Starboard
saloon with port and fascia removed
We used a variety of chisels and finally a very sharp pry bar to dislodge
the ports from the cabin side. Thankfully, like all other aspects of this
vessel, the cabin sides are strong -- about 3/4 of of solid glass. This
allowed me to use considerable force to free the port. Once the port was
out, the damaged fascia came off fairly easily so I was able to salvage
large portions to use a patterns for the replacement. It appears that the
builders did not use adhesives. The teak trim and the port was what held
the fascia in place.
|
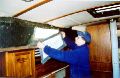
 Working in
nav station Working in
nav station
SP has the separate navigation cabin layout. After removing the port and
the fascia, Irv unscrewed the mahogany backing strip for the teak trim rail
that runs the length of the cabin beneath the port. I only had to replace
one of these one inch square strips (starboard saloon fascia) which had
rotted from water damage and broke in two during removal. |
 Covering port opening Covering port opening
To seal the port openings, I used two layers of shower curtain fabric, one
on the inside and one on the outside, secured with plenty of duck tape. |
 Exterior
port openings covered Exterior
port openings covered
To protect the gel coat on the cabin sides, I first applied blue fast
release masking tape as a base for the duck tape before securing the shower
curtain fabric. |
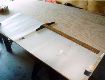
 Tracing
fascia pattern Tracing
fascia pattern
I used construction paper to trace a pattern for each fascia section. We
then transferred the pattern to 1/4 inch plywood which we impregnated with
West System epoxy on both sides. We then laminated the finished side with
1/32 inch crystal white Formica. Initially, I bought a 4 by 8 sheet of
Marine ply for $50. When a second sheet was needed, I opted for exterior
grade plywood for $15. I also ended up needing two 4 x 8 sheets of Formica
at $40 each. I still have some left over which I intend to use for ceilings
under the galley and under the bookshelves in the main saloon. |
 Fascia pattern Fascia pattern
Since I planned on covering the plywood with epoxy, marine grade ply was
actually over-kill. |
 Gluing
fascia board to Formica Gluing
fascia board to Formica
After cutting out the nav station fascia, we used the pattern to cut a hole
for the port. After that, we left the cut-out for port installation time.
Once the epoxy cured on the plywood, we cut and trimmed a piece of 1/32
inch crystal white Formica which we glued to the plywood as the interior
finished side.click for
Page 2 |
|